Removing the Add or edit stickers option won’t stop you from using desktop stickers. You can continue to use or add stickers to the desktop background using the Choose stickers for your wallpaper option present on the Background page of the Settings app. Also, you can show Add or edit stickers option in the right-click context menu of your Windows 11 desktop anytime you want. We have covered a separate section for that.
Remove Add or edit stickers context menu item in Windows 11
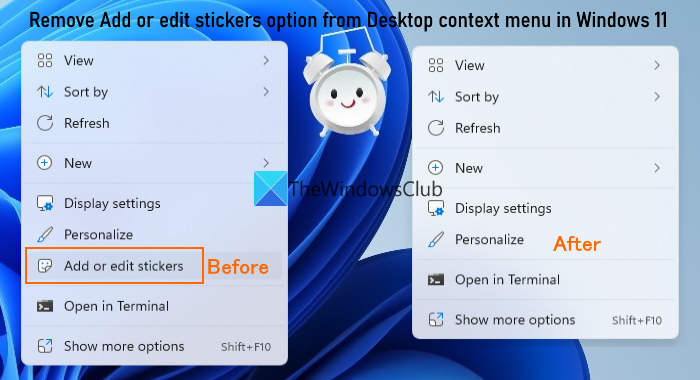
To remove the Add or edit stickers option from the desktop context menu on your Windows 11 computer, you can follow the steps mentioned below. Before that, it is advised to backup Windows Registry as it contains crucial settings. If something goes wrong, Registry backup will help you restore it. Here are the steps
Type regedit in the Search boxPress the Enter key to open Windows RegistryAccess the EditStickers Registry key. Here is the path:
You may need to change the ownership of the EditStickers Registry key to Administrators if the owner is not set to Administrators alreadyOnce the ownership is changed to Administrators, you also have to change permissions for the EditStickers Registry key’s owner to Full ControlAfter that, delete the EditStickers keyRestart File Explorer or your computer.
Now when you will open the Windows 11 desktop context menu, you will find that the Add or edit stickers option is gone. But, you can add, delete, as well as modify desktop stickers using the Settings app of Windows 11.
Show Add or edit stickers option to Desktop context menu in Windows 11
To show or get back the Add or edit stickers option to the desktop context menu in your Windows 11 computer, use these steps:
Open Windows 11 Registry EditorSelect the Shell keyAdd an EditStickers Registry keyCreate a CommandStateSync valueCreate an ExplorerCommandHandler valueAdd Value data for ExplorerCommandHandlerClose the Registry Editor.
A detailed explanation of all these steps is given below. In the first step, press the Win+R hotkey to open the Run Command box. Type regedit in its text field and press the OK button. This will open the Windows 11 Registry Editor. There, select the Shell Registry key. The path is:
Right-click on the Shell key, expand the New menu and use the Key option. This will generate a new Registry key that you need to rename with EditStickers, as visible in the image above. On the right-hand section of the EditStickers key, create a new String value, and rename it to CommandStateSync. In the same way, create another String value with the ExplorerCommandHandler name.
Open the Edit String box of ExplorerCommandHandler using double-click. Add {3C0E1E28-51F1-4130-98AC-0FBFB5FE4638} in the Value data field. Use the OK button.
The changes are added immediately. Still, you might need to restart File Explorer or your system. This will bring back the Add or edit stickers option in the right-click context menu of your Windows 11 computer. Also read: How to get the Old right-click context menu back in Windows 11.
How do I enable stickers in Windows 11?
If you want to enable desktop stickers in Windows 11, then it can be done using the Registry Editor. You need to create a Stickers Registry key under the device key. That Registry key is present in the HKEY_LOCAL_MACHINE root Registry. Once it is done, create an EnableStickers DWORD (32-bit) Value under the Stickers key and then set its Value data to 1.
How do I get rid of the Show more in Windows 11?
In order to get rid of or remove the Show more options entry from the context menu of Windows 11, you can either use the Folder Options box or a Registry trick. You also need to sign out and sign in again or simply restart your Windows 11 computer to save the changes. Once you have done that, the new right-click menu won’t be visible to you and the traditional right-click menu will come directly. Read next: How to Add, Remove, Edit Context Menu items in Windows 11/10.