How to enable Previous Versions to recover files on Windows 11/10
Previous Versions save a Shadow Copy of the selected drive. This shadow copy contains all the data inside that hard drive. If you delete the data inside the hard drive, you can recover it by using the Previous Versions feature. You can enable Previous Versions to recover files on Windows 11/10 via: Let’s see both of these methods one by one.
1] Enable Previous Versions to recover files using the File History
File History is a feature in Windows 11/10 that saves copies of your files so that you can get them back if they are lost or damaged. If you want to enable Previous Versions, you have to enable File History on your PC. To enable or turn on File History, you should connect an external storage device to your computer. That storage device can be a Pen Drive or a Hard Disk.
To enable File History, follow the steps mentioned below: After you turn on the File History, it will start creating a backup on your external storage device. The time taken by File History to create a backup of your files depends on how many files you have on your computer. If the File History does not run by itself, click Run now.
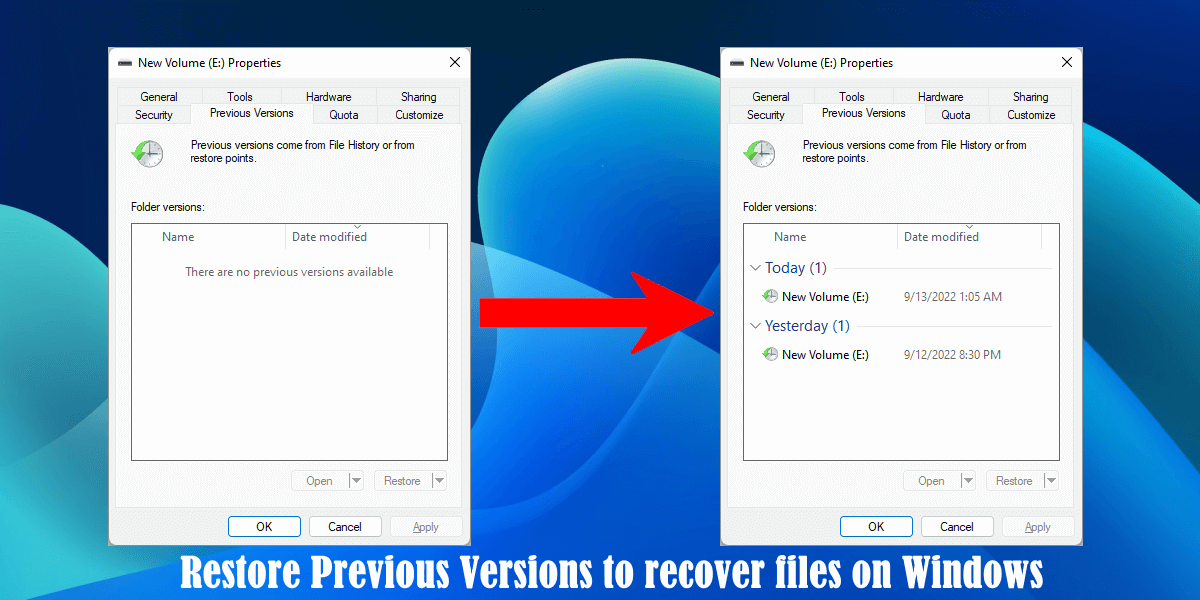
After the completion of the backup process, you will see the restore points in the Previous Versions section of your folders. To view or restore the Previous Versions of a particular folder, right-click on it and select Properties. After that, navigate to the Previous Versions tab. Do note that, the File History creates a backup of Desktop, Contacts, Downloads, Music, Videos, etc. It does not create a backup of your hard drive partitions, like C, D, F, etc. I did not find any option to enable Previous Versions on hard disk partitions using the File History. If you want to enable Previous Versions on your hard disk partitions, like C, D, F, etc., you have to create shadow copies for these hard disk partitions. You can do so by using the Task Scheduler. We have explained this in the next method.
2] Enable Previous Versions to recover files using the Task Scheduler
If you want to enable the “Previous Versions” feature on all your hard disk partitions, you have to create shadow copies for all of them separately using the Task Scheduler. Task Scheduler is an app on Windows computers that is used to schedule tasks. You can schedule Task Scheduler to create shadow copies of a particular hard drive once, daily, weekly, or monthly. We have explained the entire process below: Let’s see all these steps in detail. Click on Windows Search and type Task Scheduler. Select the Task Scheduler app from the search results. This will open the Task Scheduler. Now, right-click on the Task Scheduler Library on the left side and select New Folder. Name this new folder as per your convenience. I gave Custom Tasks name to the new folder. Now, right-click on the newly created folder, say, Custom Tasks, and select Create Task.
A new window will appear on your screen. Under the General tab, give a name to your task. For example, if you are creating a shadow copy of your E drive, you can give a name like Shadow copy of E drive. Make sure that the “Run with highest privileges” checkbox is selected under the Security Options section. Otherwise, the task will not run. You will also see the following two options under the Security Options section:
Run only when user is logged on.Run whether user is logged on or not.
By default, the former option is selected. You can leave it as is or select the latter option. If you select the latter option, you have to enter your system’s password to complete the create a task process. Also, when a task runs, a Command Prompt window appears on the screen. If you select the latter option, the Command Prompt window will not appear on your screen at the time the task runs.
Now, select the Triggers tab. Click New on the bottom left side. Select On a schedule in Begin the task drop-down. Under the Settings section, you can set if you want Task Scheduler to run the task only once or daily, weekly, or monthly.
Select the Actions tab. Click New on the bottom left side. The Edit Action window will appear. In the Action drop-down, select Start a program. Write wmic in the Program/script field and write the following string in the Add arguments (optional) field. In the above string, E represents the drive letter of which you want to create a shadow copy. If you want to create a shadow copy of another hard disk partition, say, D, you have to write D in place of E in the above string.
Now, select the Settings tab and make sure that the following options are selected (see the above screenshot):
Allow task to be run on demandRun task as soon as possible after a scheduled start is missedIf the task fails, restart every
When you are done, click OK. You will see your task in the Task Scheduler under the Custom Tasks folder or the folder that you have created for custom tasks. The task will run on the set date and time. But you can also run it manually. To do so, right-click on the task and select Run.
After running the task, the Previous Versions feature will be enabled on the selected hard disk partition. You can view the same in File Explorer. Open File Explorer, right-click on the hard disk partition, the shadow copy of which you have created using the Task Scheduler, and select Properties. Now, go to the Previous Versions tab.
Can you use System Restore to restore previous versions in File Explorer?
System Restore is a tool developed by Microsoft that helps users protect and repair computer software. When you turn on System Restore, Windows automatically creates System Restore Points which contain the snapshots of the Windows registry and system files. You can use these System Restore Points to restore your system when a problem occurs. A System Restore takes your system back to the state before the problem started. System Restore is not a file recovery utility. Hence, you cannot use it to restore the deleted files on your system. If you want to restore the deleted files, you have to create a shadow copy of your hard disk partitions. We have explained this above in this article. Read: How to share Files and Folders using File Explorer.
How to restore previous versions of files in Windows 11/10
Above, we have explained two methods to enable the “Previous Versions” feature in File Explorer. The first method requires an external storage device and the other method does not require an external storage device. If you have enabled the “Previous Versions” feature using an external storage device, you have to connect that device to your computer to restore the deleted files, otherwise, you will get the following message:
Connect the external storage device on which you have created the backup of previous versions of your files, then open File Explorer. After that, open the properties of a folder, like Downloads, Music, etc., and navigate to the Previous Versions tab. Select the Previous Version from the list and click Restore. Reconnect the drive and then try again. If you have enabled the “Previous Versions” feature by following the second method, you need not require an external storage device. Also, this method works on hard disk partitions. Now, to restore your deleted or missing files on hard disk partitions, follow the steps written below:
Read: How to sort Folders by Size or Month in Windows.
Why is restore previous version not available?
You can restore deleted files using the “Previous Versions” feature in File Explorer. To access this feature, you have to open the Folder Properties or Hard disk partition properties. By default, this feature is disabled in File Explorer. If you open your folder properties or hard disk partition properties and go to the Previous Versions tab, you will see the following message: To use previous versions, you have to enable this feature. We have explained how to enable Previous Versions to recover files on Windows 11/10 above in this article.
How do I enable Previous Versions?
You can enable Previous Versions by creating a shadow copy of a folder or hard disk partition. For this, you can use the File History utility in Windows 11/10 or the WMIC command in the Task Scheduler. We have explained both these methods in detail above in this article.
Does Windows 11 have File History?
Yes, Windows 11 has File History but you will not find it in Windows 11 Settings. You can access the File History on Windows 11 in the Control Panel. Open the Control Panel and go to “System and Security > File History.” Alternatively, you can also search for File History in the Control Panel search bar. On the File History page, you can create a backup for your files by connecting an external storage device. I hope this helps. Read next: File Explorer not highlighting selected files and folders.