Warning: We are going to use a DLL here, and change a core file of Windows OS. While it works, we would highly recommend that you create a restore point before going ahead with it.
Enable Settings header design on Windows 10
Head design is not officially available on Windows 10. However, one can enable it using a third-party tool. Once installed, reopen the Settings, and you should have it right on the front.
Download the ZIP file from here. Make sure to correctly choose between x86(32bit) and x64(64 bit). If Windows Defender gives out a warning, ignore it as it is a false positive. Right-click on the downloaded folder, and extract the content. Verify if you have these files: Open Command Prompt with admin privileges. Navigate to the extracted folder. You can find the path from the File Explorer. Copy the path and type the following and hit Enter: Next type mach2 enable 18299130 and hit Enter.
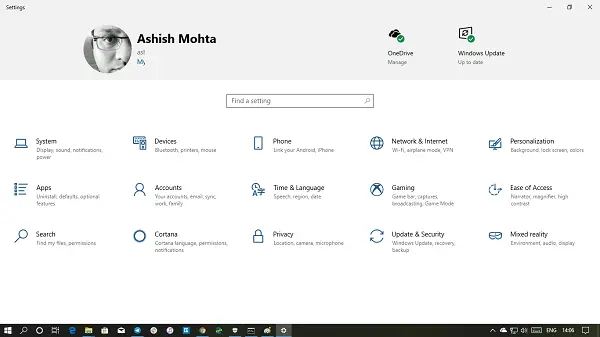
Open Settings page and Settings header design should be available. It includes your profile, email ID, link to OneDrive, and Windows. Clicking on the OneDrive opens OneDrive, and when you click on Windows Update, it will directly take you to the Windows Update section. Notice that there is a green icon for each of them. If it is red, it means that settings need attention, grey means the services have stopped. If it is green, all is well. A direct link to open Microsoft account is also available under your profile picture. Microsoft may have their reasons to remove this, but this header looks interesting. I am sure it can have more vital links including recommended troubleshooting, or Windows Defender notification and so on. Lastly, make sure to track the download page for any update which becomes available in the future. You will have to keep it update if you want more features.