How to create a Photo Album in PowerPoint
Open PowerPoint
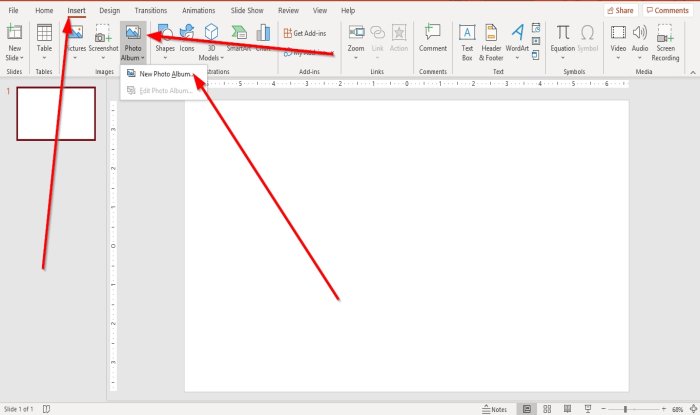
Go to the Insert tab in the Images group and click Photo Album. In the Photo Album list, click New Photo Album.
A Photo Album dialog box will appear. Inside the dialog box, click File/Disk.
An Insert New Picture dialog box will open. Select the picture files you want. To select all of your picture files, put them into a folder. Click on one picture file, hold down the Shift key and press the down arrow key to select all files. Click Insert.
To place a text box into the layout, click New Text Box in the Photo Album dialog box.
You can adjust the pictures and text boxes’ order by moving them up and down or even removing them by clicking inside the check box and clicking the Up, Down, and Remove buttons below the Pictures in Album display box. Under the Preview box, you can alter the Angle of Rotation, Contrast, and Brightness of the displayed picture. Where you see Picture Options, you will notice that the Caption below all pictures is disabled, and also Frame Shape under Album Layout; this is because, in the Picture Layout list box, Fit to slide is inside. Remove Fit to slide and select something else from the Picture Layout list; select Four pictures or any other option from the list, according to how you want your photo album layout. In the Picture Options area, you can choose if you want the picture to have Captions below all pictures or All pictures black and white. In the Album Layout section, where you see Frame shape, select the frame you want. You will see a display of your desired frame on the right. Where you see Theme, click Browse.
A Choose Theme dialog box will open; choose the theme you want and click Select.
In the Photo Album dialog box, click Create. You have created a photo album presentation.
You will see that PowerPoint will automatically add a name with a heading in the first slide.
In the second slide, we have selected four pictures from the Picture Layout list, the layout as four pictures inside it.
The Third slide has a text box. You can make changes to the text inside the slides if you want by clicking on it. Read: How to add & use Pickit Free Images add-in to Office.
How to edit a custom photo album in PowerPoint
On the Insert tab in the Images group, click Photo Album. In Photo Album drop-down list, click Edit Photo Album.
An Edit Photo Album dialog box will pop up; make your changes and click Update. If you have questions, please comment below. Read next: How to add and remove Slide Layout in PowerPoint.