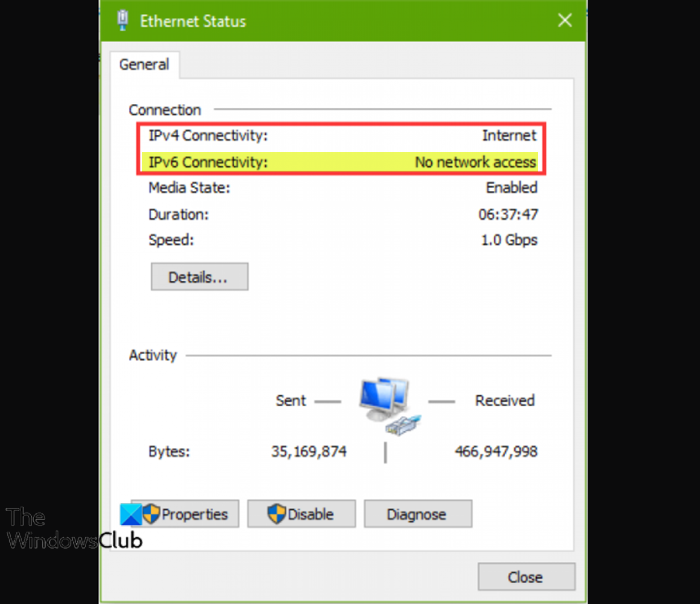
Why does IPv6 say No network access?
If you have encountered the IPv6 No internet access problem on your Windows PC, it’s most likely due to you’re using the wrong ethernet driver or it’s out of date or corrupted or damaged. In any case, to resolve the issue, update your ethernet network card drivers. The most likely culprits to this error include-
Incorrect HT Mode settings.Obsolete network adapter drivers.Incorrect DNS and IP addresses.Third-party antivirus software.
Fix IPv6 Connectivity, No network access error
If you’re faced with this IPv6 Connectivity, No network access error, you can try our recommended solutions below in no particular order and see if that helps to resolve the issue. Let’s take a look at the description of the process involved concerning each of the listed solutions. Before you try the solutions below, make sure IPv6 is enabled and also check for updates and install any available bits on your Windows device and see if the error reappears.
1] Restart PC and Internet device
Your first line of action in resolving theerror is to restart your PC as well as your internet device (modem/router).
2] Temporarily disable third-party security software (if applicable)
This solution requires you to disable, or better still uninstall any third-party security software installed on your Windows 10/11 PC, using the AV dedicated removal tool. To disable your antivirus software, locate its icon in the notification area or system tray on the taskbar (usually in the lower right corner of the desktop). Right-click the icon and choose the option to disable or exit the program.
3] Uninstall VPN client (if applicable)
If you are actively connecting via a VPN on your Windows PC you may encounter this error. In this case, you can uninstall the VPN software and see if that helps resolve the issue.
4] Run Network Troubleshooter
This solution requires you to run the Network Troubleshooter to resolve any network-related issues on your Windows 11/10 computer.
5] Release/Renew IP, reset Winsock, and flush DNS
This solution requires you to release and renew IP, reset Winsock, and flush DNS. If this operation fails to resolve the issue, proceed with the next solution.
6] Update network card drivers
Obsolete, damaged or corrupted network card drivers can trigger this error. In this case, to rule out this possibility, you can update your network adapter drivers manually via the Device Manager, or you can get the driver updates on the Optional Updates section under Windows Update. You may also download the latest version of the driver from the network card hardware manufacturer’s website.
7] Disable IP Helper service
This solution requires you to disable the IP Helper service and see if the issue at hand is resolved.
8] Set Network Adapter to HT mode
HT mode allows you to specify which modes to support High Throughput (802.11n) and/or Very High Throughput (802.11ac). This solution requires you to set the network adapter to HT mode on your Windows PC. Here’s how:
Press Windows key + R to invoke the Run dialog.In the Run dialog box, type ncpa.cpl and hit Enter to open Network Connections control panel.Next, right-click your active network adapter and select Properties.In the properties window, click Configure button.In the network adapter properties window, click Advanced tab.Select HT mode under Property section.Click OK.Exit Network Connections control panel.Restart PC.
Check if you can now connect to the network; otherwise, try the next solution.
9] Set IP and DNS address to Automatic
Do the following:
Press Windows key + R to invoke the Run dialog.In the Run dialog box, type ncpa.cpl and hit Enter to open Network Connections control panel.Next, right-click on the network connection you are using and click on Properties.Select and double-click the Internet Protocol Version 4 (TCP/IPv4) option to edit its properties. In the General tab, make sure the radio button is set to Obtain an IP address automatically and Obtain DNS server address automatically.Click OK to save the changes.Click OK again to exit Network Connections properties.Exit Control Panel.Restart PC.
If you’re still unable to connect to the network using the IPv6 protocol, try the next solution.
10] Use IPv4
If none of the listed solutions in this post has worked for you, you can use IPv4 since IPv6 is not mainstream anyways. To use IPv4 on your Windows PC, you need to disable IPv6 and then your system will automatically default to IPv4 protocol. Hope these solutions help you!
Is IPv6 faster than IPv4?
Based on tests carried out, IPv4 comes out on top. In theory, that IPv6 could be faster than IPv4 is predicated on the fact that cycles don’t have to be wasted on NAT translations. However, IPv6 also has larger packets, which may make it slower for some use cases – but with time and fine-tuning, IPv6 networks might become the de-facto protocol and will get faster. Related post: Fix Unable to contact your DHCP Server error on Windows.