Disk Cleanup Tool & Storage Sense includes Downloads folder
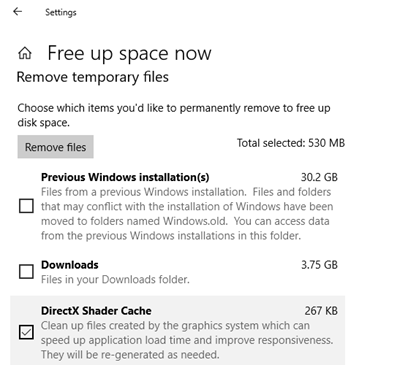
If you are still using Disk Cleanup Tool, here is a bit of warning. Disk Cleanup tool now has included the Downloads folder as well after the recent v1809 Update. This wasn’t there before the feature update. The Downloads folder is one of the most used folders where we keep downloaded files for some time. I am sure not everyone wants the system to empty it completely without warning. So before you run Disk Cleanup, make sure that the Downloads folder option in unchecked – if you do not want to empty that folder. You can launch this Disk Cleanup tool by typing cleanmgr.exe in your Run prompt. Once it launches, select the drive, hit the Disk Cleanup button and then you will get these options right away. The Storage Sense feature in Windows Settings offers a better view and clarity on what it is going to delete. It offers the same set of the features as Disk Clean Up tool and now includes the Downloads folder option as well. Since you get better clarity on what is going to be deleted, we highly recommend you to switch to it.
Go to Setting > System > Storage, and click on Free up Space link to launch. Even when using this tool, we suggest you make sure not to select the Downloads folder unless you are sure about it. A small tip you might want to know – lest you end up selecting all the options blindly, and losing all your downloads. Windows 11 user? This post will show you how to use Storage Sense in Windows 11 to free up disk space.